I have over 25 years worth of xeroxed notes, designs, pattern instructions, grammar lessons etc. I want to convert them all into digital copies.
I've found ABBY FineReader to be a useful tool to help me with this. Most of the xeroxed notes are of very poor quality. Yet I've been able to successfully scan and edit them into word files.
Here are the steps. (Click directly on the pictures to enlarge them.)
First connect your scanner to your computer and place the book or document to be scanned face down on the scanner.
Step 1: Now open ABBY FineReader and select New Task.
Step 2: It opens the dialog box shown below. In the document layout area make sure you've selected "Editable copy".
Step 3: Check or uncheck as per your requirements, "Keep pictures" and "Keep headers and footers".
Step 4: Select "Scan to Microsoft Word". You'll be taken to the page displayed below.
 Do you see the area marked in red in the picture on your left? Notice that some of the scanned text is outside the green selection area.
I've found ABBY FineReader to be a useful tool to help me with this. Most of the xeroxed notes are of very poor quality. Yet I've been able to successfully scan and edit them into word files.
Here are the steps. (Click directly on the pictures to enlarge them.)
First connect your scanner to your computer and place the book or document to be scanned face down on the scanner.
Step 3: Check or uncheck as per your requirements, "Keep pictures" and "Keep headers and footers".
Step 4: Select "Scan to Microsoft Word". You'll be taken to the page displayed below.
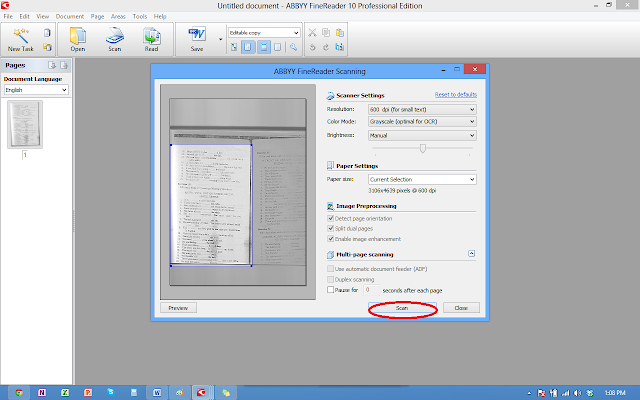
Step 5: Make sure the "scanner and paper settings" are as per your requirements. Check or uncheck the appropriate boxes in the "image preprocessing" area and then click the "Preview" button. The scanner will show you an image of the document as in the picture below.
Step 6: Select the section to be scanned. Place your cursor at one of the points I've marked in red in the picture above to do this. In the picture below, I've selected the area to be scanned.
Step 7: Now click on "Scan". Once the scanning is complete click on "Close". If you are scanning multiple pages, click close after you're done with all the pages.
Step 8: This is what you'll see on your screen now: an image of your scanned page and ABBY FineReader recognizing the page.
This is what the recognized page looks like. But wait! We're still not ready to start editing.
 Do you see the area marked in red in the picture on your left? Notice that some of the scanned text is outside the green selection area.
The image below shows you how to rectify this.
See the areas I've circled in red? Place your cursor on one of them and drag down until all of the text is covered. When you've done that, the page looks like the one below.
Step 9: You are now ready to start editing the page. This section has all the editing tools of a Word document.
Step 10: After you've edited the document, save your work. Saving opens a Word document with your edited text in it.
Step 11: Check the Word document to see if everything is as it should be. If the texts looks very tiny or very different than it would in your normal document, just check the lower right hand corner and adjust the settings to 100. I've shown where you'll find it in the image above.
You now have your document scanned to MS Word.


No comments:
Post a Comment